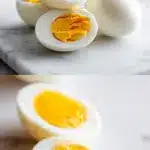
Perfect hard boiled eggs eluded me for years. I’d end up with torn whites and chalky, gray-green yolks every single time. The fix? A sudden temperature shock, not a slow simmer.
No more picking off tiny shell fragments or watching the egg white tear away in ragged chunks. This boiling water method gives you smooth peeling and tender, bright yellow centers.
Inside: the exact timing for different yolk textures, the science behind easy peeling, and a tested substitutions table for cooking at high altitudes.
Table of Contents
The Science of Easy Peel Hard Boiled Eggs
Understanding why some eggs peel beautifully while others leave you chiseling shell fragments off a pockmarked white comes down to basic biology. An egg white contains a thin outer layer of albumen that sits right against the shell membrane.
When you cook an egg starting in cold water, that outer albumen heats slowly and fuses stubbornly to the inner membrane. As it cooks, it essentially glues the shell to the solidifying white. This is why the cold-start method so often leads to tearing and frustration.
The hot-start method changes the chemistry entirely. By lowering your eggs directly into already-boiling water, the outer albumen sets almost instantly. It firms up before it has a chance to bond with the membrane.
You will notice a visible gap between the cooked white and the shell. The peeling process practically glides after that. This rapid coagulation is what gives you smooth-surfaced eggs instead of pockmarked ones.
Age matters just as much as temperature. Farm fresh eggs are wonderful for frying and poaching, but they are notoriously difficult to peel once hard cooked. As an egg ages, it naturally loses moisture through its porous shell, and the air pocket inside expands.
This gradual separation of the membrane from the shell means older eggs slip out of their shells with almost no resistance. Buy your eggs a week or two before you plan to boil them.
You also want to avoid the dreaded green ring. That grayish-green halo around the yolk is a chemical reaction where sulfur in the white meets iron in the yolk under prolonged heat. It is harmless but visually unappealing.
Cooking the eggs for the precise time needed and immediately shocking them in icy water halts this reaction instantly. If you want to use your eggs for a quick creamy egg bites recipe, preventing this reaction keeps the yolk sunny and appetizing.
Temperature Shock is Key
Moving the eggs directly from boiling water into an ice bath causes the egg inside to shrink slightly, pulling away from the shell. Prepare your ice bath before the eggs even go on the stove so you can move them within seconds.
Choosing Your Eggs
Standard large eggs from the grocery store work perfectly if they have been sitting in your fridge for a week. Reserve those beautiful fresh eggs from the farmers market for sunny side up preparations where the yolk needs to stand tall.
Print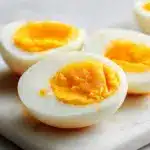
Perfect Hard Boiled Eggs Every Time: The Easy-Peel Method
- Total Time: 27 min
- Yield: 6 eggs 1x
Description
A simple method for making perfect hard boiled eggs with firm whites and creamy yellow yolks that peel easily every time.
Ingredients
For the eggs:
6 large eggs (refrigerated, at least 1 week old)
1 gallon water (divided use)
For the ice bath:
4 cups cold water
2 cups ice cubes
Instructions
1. Bring a large pot of water to a rolling boil over high heat.
2. Gently lower the cold eggs into the boiling water using a slotted spoon.
3. Reduce the heat slightly to maintain a rapid simmer and cook for exactly 12 minutes.
4. While the eggs cook, prepare a large bowl filled with cold water and ice cubes.
5. Remove the eggs from the boiling water and immediately plunge them into the ice bath.
6. Let the eggs rest in the ice water for at least 10 minutes to stop the cooking.
7. Tap the eggs on the counter to crack the shells and peel under cold running water.
Notes
Store peeled eggs in an airtight container in the refrigerator for up to 5 days.
For the easiest peel, use eggs that are at least a week old rather than fresh from the farm.
If you live at a high altitude, add 2 minutes to the boiling time to ensure the yolks cook through completely.
- Prep Time: 5 min
- Rest Time: 10 min
- Cook Time: 12 min
- Category: Breakfast
- Method: Stovetop
- Cuisine: American
Nutrition
- Serving Size: 1 egg
- Calories: 78 kcal
- Sugar: 0 g
- Sodium: 62 mg
- Fat: 5 g
- Saturated Fat: 2 g
- Unsaturated Fat: 3 g
- Trans Fat: 0 g
- Carbohydrates: 0 g
- Fiber: 0 g
- Protein: 6 g
- Cholesterol: 187 mg
Ingredients
Prep Time: 5 minutes | Cook Time: 12 minutes | Rest Time: 10 minutes | Total Time: 27 minutes | Yield: 6 eggs
For the eggs:
- 6 large eggs (refrigerated, at least 1 week old)
- 1 gallon water (divided use)
For the ice bath:
- 4 cups cold water
- 2 cups ice cubes
The Hot-Start Boiling Method Step by Step
The hot-start method requires a bit of timing precision but yields consistent results. First, select a saucepan large enough to hold your eggs in a single layer without crowding. If they knock against each other during the vigorous boiling process, they will crack.
Fill the pan with enough water to cover the eggs by at least an inch once they are submerged. You will need to bring this water to a rolling boil over high heat. While the water heats, prepare a large bowl filled with cold water and a generous amount of ice cubes.
Once the water reaches a rolling boil, use a large slotted spoon to gently lower the eggs into the water one by one. Dropping them too quickly can cause them to hit the bottom hard and crack.
Once all your eggs are in the pot, reduce the heat slightly so the water maintains a rapid simmer rather than a violent boil.
This prevents the eggs from bouncing around and cracking while still cooking them evenly. If you want to make a large batch for the week, you might also enjoy these easy healthy egg muffins recipe for a grab-and-go breakfast.
Now you must set your timer based on your desired yolk consistency. For a true hard boiled egg with a firm but still creamy yolk, twelve minutes is the sweet spot for large eggs. At ten minutes, you will get a slightly jammy center.
At fifteen minutes, the yolk becomes entirely powdery and dry. Keep an eye on the clock. When the timer goes off, use your slotted spoon to quickly lift the eggs out of the hot water and immediately plunge them into your waiting ice bath. Leave them there for at least ten minutes.
This ten-minute rest in the ice water is non-negotiable. It completely stops the cooking process and contracts the egg inside the shell. If you skip this step, residual heat will continue to cook the yolks, turning them dry and green. The ice bath also makes the membrane contract, loosening the shell.
Once the eggs are completely cooled, tap them gently on the counter to crack the shell all over. Roll them gently under your palm to loosen the network of cracks. Peel them under cold running water to wash away any stubborn shell bits.
- Bring a large pot of water to a rolling boil over high heat.
- Gently lower the cold eggs into the boiling water using a slotted spoon.
- Reduce the heat slightly to maintain a rapid simmer and cook for exactly 12 minutes.
- While the eggs cook, prepare a large bowl filled with cold water and ice cubes.
- Remove the eggs from the boiling water and immediately plunge them into the ice bath.
- Let the eggs rest in the ice water for at least 10 minutes to stop the cooking.
- Tap the eggs on the counter to crack the shells and peel under cold running water.
Perfect Timing Chart for Yolk Doneness
Timing is everything when boiling eggs, and a difference of just one minute changes the texture of the yolk. Use this chart to find your ideal time for perfect hard boiled eggs. All times assume large eggs straight from the refrigerator and dropped into boiling water.
- Six minutes: A liquid, runny yolk perfect for ramen bowls.
- Seven minutes: A gooey, jammy yolk that holds a soft shape.
- Eight minutes: A soft boiled egg with a firm white and soft yolk center.
- Nine minutes: A medium boiled egg with a tender, chewy yolk.
- Ten minutes: A slightly soft hard boiled egg, ideal for egg salad.
- Twelve minutes: The classic hard boiled egg with a firm, creamy yolk.
- Fifteen minutes: A very firm, crumbly yolk best for grating over salads.
If you live at a high altitude, water boils at a lower temperature because of the reduced atmospheric pressure. You will need to add an extra minute or two to your cooking time to get the same results.
The best way to know if your timing is right is to crack one egg open after the ice bath to test it. Adjust your timer up or down by thirty seconds for your next batch.
Once you have your timing dialed in, you have a versatile protein ready for many meals. Try slicing them over a bowl of how to make the perfect spicy rice recipe for a protein boost.
The firm white provides texture while the yolk adds a rich, savory note that balances the heat. You can also mash them with a fork for a classic egg salad sandwich.
Tested Substitutions and Variables
Cooking is full of variables, and eggs are sensitive to changes in environment and equipment. If you find yourself without certain tools or living in a specific climate, you might need to adjust your approach.
Below is a table of tested substitutions I use when making hard-cooked eggs. These swaps address real challenges like high altitude, missing ice, or differences in egg size.
| Swap | Use Instead | What Changes |
|---|---|---|
| Ice bath unavailable | Very cold running tap water for 5 minutes | Peeling is slightly harder, yolk may have a faint green ring if not cooled fast enough. |
| Extra large eggs | Add 1 minute to boiling time | Yolk sets perfectly, white becomes slightly firmer and less tender. |
| High altitude (5000 ft) | Add 2 minutes to boiling time | Yolk cooks through completely without turning powdery or dry. |
| Fresh eggs from farm | Steam for 15 minutes instead of boiling | Shells release easily, whites stay tender, prevents ragged peeling. |
| No slotted spoon | Tongs used gently | Risk of cracking increases, but moving quickly preserves the ice bath stop. |
| Medium eggs | Subtract 1 minute from boiling time | Yolk stays creamy without overcooking, white remains delicate. |
These adjustments come from extensive testing in my own kitchen. Steaming fresh eggs is a particularly useful trick if you get a farm box delivery. Steam penetrates the shell and cooks the white firmly without causing it to bond to the membrane.
The result is an egg that peels beautifully. You can slice these steamed eggs for an ultimate pasta salad recipe without worrying about the whites tearing into unattractive shreds.
Altitude Adjustments
Water boils at 202 degrees Fahrenheit at 5000 feet instead of 212 degrees. That lower temperature means your eggs cook slower. Always test one egg first to calibrate your stove and your elevation.
Steaming as an Alternative
If boiling frustrates you, try a steamer basket. Add an inch of water to the pot, bring it to a boil, set the basket of eggs inside, cover, and steam for exactly fifteen minutes. Transfer to an ice bath exactly as you would for boiling.
Peeling, Storing, and Serving Perfect Hard Boiled Eggs
Even with the perfect cooking method, your technique for peeling and storing matters. After the ice bath, tap the egg on your counter to create a web of cracks. Start peeling at the wider bottom end where the air pocket lives.
There is often a small gap there that makes it easy to get your fingernail under the membrane. Once you break that membrane seal, the shell often slides off in large pieces. Hold the egg under cold tap water to help wash away any tiny fragments and help the shell slip off.
If you still struggle with peeling, try peeling the egg under a gentle stream of cold water. The water seeps between the membrane and the white, acting as a lubricant.
For the easiest peel, some cooks prefer to peel the eggs while they are still slightly warm from the ice bath. The cold contracts the egg but the slight warmth keeps the membrane flexible. A good hard boiled egg should have a smooth, clean white surface.
Store your peeled eggs in an airtight container in the refrigerator for up to five days. Cover them with a damp paper towel to prevent the whites from becoming rubbery.
If you store them unpeeled, keep them in their shells in the refrigerator for up to one week. Do not freeze whole hard boiled eggs because the whites will become tough and watery upon thawing.
These eggs are versatile in the kitchen. Mash them with mayonnaise and mustard for a classic egg salad. Halve them and remove the yolks to make deviled eggs for your next gathering. You can also slice them for a protein topping on a fresh italian pasta salad recipe.
The firm texture holds up well to tossing without breaking down. If you want something spicy, top your eggs with a drizzle of how to make spicy mayo sauce creamy and hot for a quick snack.
Serving Suggestions
Serve sliced eggs over avocado toast, crumble them into a Caesar salad, or pack them whole for a high-protein afternoon snack. A sprinkle of smoked paprika or sea salt brings out their rich flavor.
Storage Tips
Never store hard boiled eggs at room temperature for more than two hours. Keep them in the coldest part of your refrigerator, usually the back of the middle shelf, to maintain food safety.
Frequently Asked Questions
What is the secret to perfect hard-boiled eggs?
The secret is starting with boiling water instead of cold water. Lowering eggs directly into boiling water causes the outer albumen to set instantly, preventing it from fusing to the shell membrane. An immediate ice bath after cooking stops the process and creates a gap for easy peeling.
What is the 10 5 10 rule for boiling eggs?
This rule suggests steaming eggs for ten minutes, resting them for five minutes, and cooling them in an ice bath for ten minutes. This specific timing works well for standard large eggs and keeps the yolk cooking through without turning powdery. It is a popular alternative to the traditional boiling method.
How long does it take to boil a perfectly hard-boiled egg?
It takes exactly twelve minutes to boil a large egg from the refrigerator to achieve a firm white and a creamy, bright yellow yolk. Medium eggs take eleven minutes, while extra large eggs need thirteen minutes. Always transfer them to ice water immediately after boiling.
Do you put eggs in hot or cold water to boil?
You should put eggs in already hot, boiling water to make them easy to peel. Starting in cold water causes the egg white to bond tightly with the shell. Dropping them into boiling water shocks the proteins and keeps the shell from sticking.
Can you boil eggs in the microwave?
You should never boil eggs in their shells in the microwave. The rapid buildup of steam inside the shell will cause the egg to explode. If you want to cook eggs in the microwave, crack them into a bowl and scramble them with a splash of milk.
Make Perfect Hard Boiled Eggs Your Weekly Habit
Mastering perfect hard boiled eggs comes down to timing and temperature control. By using the hot-start method and an immediate ice bath, you prevent that frustrating gray-green ring and get smooth, easy peeling every time.
Bookmark this for your next Sunday dinner prep or your next big batch of deviled eggs. Having a reliable method in your back pocket makes meal planning so much easier.
For more recipes like perfect hard boiled eggs, follow us on Facebook and Pinterest for quick breakfast ideas.
More recipes in this series: