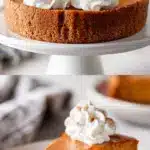
The first time I pulled an impossible pumpkin pie out of the oven, I was convinced I had ruined Thanksgiving. The batter looked watery and thin, completely unlike a traditional pie.
Most crustless pumpkin pies suffer from a gummy center or a soggy bottom that ruins the whole texture. This recipe solves that by letting the baking mix sink and bake into a golden, self-forming crust right underneath a silky spiced custard.
We will get into the science of the self-forming crust, the exact spice blend for deep flavor, and the one resting rule that guarantees clean slices every single time.
Table of Contents
The Magic Behind the Self-Forming Crust
The true wonder of an impossible pie lies in its brilliant culinary physics. When you blend together pumpkin puree, evaporated milk, eggs, sugar, and a commercial baking mix like Bisquick, you are creating a very specific fluid dynamic. The liquid batter you pour into your buttered pie plate is completely uniform. There are no layers, no carefully crimped dough, and no separate crust to parbake. As this mixture sits in the warm oven, the heavier starch molecules from the baking mix begin to sink toward the bottom of the dish. Meanwhile, the lighter pumpkin fibers and milk fats rise to the top.
This separation happens slowly during the first stage of baking. The heat of the oven causes the butter inside the baking mix to melt rapidly. Since you will blend melted butter right into the batter, some of it will naturally float to the top of the pie, creating a beautifully bronzed and slightly crisp surface. The starch that sinks to the bottom absorbs moisture from the evaporated milk and eggs, gelatinizing into a soft, pastry-like layer that mimics a traditional crust. It will not be a flaky, brittle crust like a traditional pate brisee, but rather a tender, cake-like base that holds the custard perfectly.
You can think of this process as a cousin to the technique used in a baby lemon impossible pie, where the same science creates a distinct three-layer dessert from a single pour. The trick is trusting the process. When you peek through the oven door during the first twenty minutes, you will see a bubbling, watery soup that looks like a complete failure. Resist the urge to open the door and stir. The oven’s ambient heat is doing the heavy lifting of stratification.
The baking mix is the real workhorse here. It contains flour, a leavening agent, and fat. If you prefer to make your own homemade baking mix, simply combine one cup of all purpose flour, one and a half teaspoons of baking powder, and a tablespoon of cold butter cut into the flour. However, for the most reliable texture, a standard commercial mix yields the most consistent results. The pumpkin puree adds fiber and moisture, which means the final texture is somewhere between a dense custard and a moist sponge cake. It slices beautifully once it has cooled. The bottom layer firms up enough to hold its shape on a serving plate, giving you all the satisfaction of a crusted dessert without the chilling, rolling, and blind baking.
Print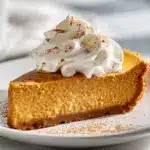
The Magic of Impossible Pumpkin Pie: A Crustless Wonder
- Total Time: 93 min
- Yield: 8 servings 1x
- Diet: Vegetarian
Description
This impossible pumpkin pie is a crustless wonder that forms its own tender bottom layer as it bakes. By blending a simple batter of pumpkin puree, dairy, eggs and baking mix, the starch sinks to create a crust while the top sets into a smooth spiced custard.
Ingredients
For the pie:
1 can (15 oz) pumpkin puree (100 percent pure, not pie filling)
1 can (12 oz) evaporated milk
4 large eggs (room temperature)
1/2 cup unsalted butter (melted and slightly cooled)
1 cup white sugar
1 cup Bisquick baking mix
1 tsp pumpkin pie spice
1/2 tsp ground cinnamon
1/4 tsp ground ginger
1/4 tsp salt
For serving:
1 cup heavy whipping cream
1 tbsp powdered sugar
1/4 tsp vanilla extract
Instructions
1. Preheat your oven to 350 degrees Fahrenheit and generously grease a 9 inch glass or ceramic pie plate with butter to prevent the crust from sticking.
2. Add the evaporated milk, eggs, melted butter, and white sugar to a blender jar. Blend on low speed for 15 seconds until the mixture is smooth and the sugar begins to dissolve.
3. Add the pumpkin puree, baking mix, pumpkin pie spice, cinnamon, ginger, and salt to the blender. Blend on low speed for another 20 seconds, stopping to scrape the sides once, just until the dry ingredients are fully incorporated. Do not overmix.
4. Pour the thin orange batter directly into your prepared pie plate. The batter will look very watery but it will separate correctly during baking.
5. Bake in the preheated oven for 53 minutes. The edges should be puffed and dark golden brown, and the center should still have a slight jiggle when you gently shake the plate.
6. Remove the pie from the oven and place it on a wire rack. You will hear a faint crackling sound as the hot custard begins to cool and contract.
7. Let the pie rest at room temperature for at least 30 minutes so the bottom crust layer can fully set up and the custard stops weeping.
8. Whip the heavy cream with the powdered sugar and vanilla extract until soft peaks form. Slice the cooled pie into 8 wedges and serve with a dollop of the fresh whipped cream.
Notes
Store the baked pie covered in the refrigerator for up to 4 days or in the freezer for up to 2 months. Reheat individual slices in a 300 degree oven for 10 minutes.
You can substitute the white sugar with dark brown sugar for a deeper caramel flavor that pairs beautifully with the pumpkin.
If you do not have a blender, you can whisk the ingredients together vigorously in a large mixing bowl, making sure to whisk the baking mix in last to avoid lumps.
For a dairy free version, substitute the evaporated milk with full fat coconut milk and use melted coconut oil instead of butter.
- Prep Time: 10 min
- Rest Time: 30 min
- Cook Time: 53 min
- Category: Dessert
- Method: Baking
- Cuisine: American
Nutrition
- Serving Size: 1 slice
- Calories: 285 kcal
- Sugar: 24 g
- Sodium: 310 mg
- Fat: 16 g
- Saturated Fat: 9 g
- Unsaturated Fat: 5 g
- Trans Fat: 0 g
- Carbohydrates: 32 g
- Fiber: 2 g
- Protein: 6 g
- Cholesterol: 110 mg
Crafting the Perfect Pumpkin Custard Layer
The top layer of your impossible pumpkin pie is where the flavor lives. This is the silky, rich custard that tastes like autumn in a bite. To get that texture right, you have to pay attention to the dairy and the spices. Evaporated milk is the classic choice here because it has had sixty percent of its water removed. This concentration of milk solids gives the custard a creamy, sturdy structure without making it watery. If you were to use regular whole milk, the pie would come out too loose and the crust layer would never fully set.
You want to whisk the eggs and the sugar together until they are pale and slightly thickened. This introduces air into the batter and ensures the sugar dissolves completely. The eggs provide the structural network that traps the pumpkin puree and spices. When looking for an easy pumpkin pie, people often skimp on the spices, but this is a mistake. Pumpkin puree is surprisingly plain on its own. It is a blank canvas that desperately needs aromatics.
A standard pumpkin pie spice blend is a mix of cinnamon, nutmeg, and ginger. For this recipe, I like to double down on the ginger to give it a slight, warming bite that cuts through the richness of the evaporated milk. The smell of these spices toasting in the oven is incredible. You will notice the warm, woody aroma of cinnamon filling your kitchen around the twenty minute mark. It is a scent that instantly makes the house feel cozy.
You can certainly use canned pumpkin puree for this recipe, and honestly, I prefer it. Canned puree has a lower water content than homemade roasted pumpkin, which means your impossible pie will set up faster and slice cleaner. Just make sure you are buying one hundred percent pure pumpkin puree and not canned pumpkin pie filling, which already contains spices and sugar and would throw off the balance of your dessert.
If you want to bring out the flavor even more, try blooming your spices. You can melt the butter in a small saucepan, add the spices, and let them sizzle for thirty seconds before adding them to the blender. This step wakes up the volatile oils in the cinnamon and nutmeg. It adds a depth of flavor that tastes like you spent hours simmering the filling. This extra step takes barely a minute but makes a huge difference in the final taste of your Bisquick pumpkin pie. The rich dairy, the earthy squash, and the toasted spices combine to create a filling that is smooth, velvety, and deeply comforting.
Baking and Resting for Flawless Texture
The baking process for an impossible pumpkin pie is slightly different from a standard custard pie. Because the batter is so wet, it requires a longer bake time at a moderate temperature to ensure the center sets without burning the edges. You will bake this pie at 350 degrees Fahrenheit for about fifty three minutes. The edges should puff up and turn a deep golden brown, while the center will still have a slight jiggle when you gently shake the pie plate. This jiggle is exactly what you want. It means the custard is set but still moist, and it will finish firming up as it cools.
One of the most important steps in this entire recipe happens after the oven is turned off. The resting period is absolutely mandatory. You must let the pie cool at room temperature for at least thirty minutes, and ideally a full hour, before slicing into it. During this time, the residual heat continues to gently cook the center of the pie. If you slice it while it is piping hot, the custard will weep and the bottom crust layer will tear. As the pie cools, the starches in the baking mix retrograde, which is a fancy way of saying they firm up and lock into place. The pie will pull away slightly from the edges of the dish, signaling that it is ready to be served.
- Overmixing the batter. Blending on high speed for too long incorporates too much air, causing the pie to puff up dramatically and then collapse into a dense puddle. Mix on low speed just until the ingredients are combined.
- Opening the oven door early. Peeking during the first thirty minutes lets heat escape and stops the baking mix from sinking and forming the crust layer. Use the oven light to check on it instead.
- Using pumpkin pie filling instead of puree. The pre-sweetened filling will make your pie excessively sweet and the extra moisture will prevent the bottom crust from setting properly. Always buy one hundred percent pure pumpkin.
- Skipping the resting time. Cutting into the pie while it is still hot will cause the custard to run and the crust to fall apart. Let it sit at room temperature for an hour so the layers can fully set.
- Using a glass pie plate without adjusting the temperature. Glass retains heat and can overbrown the bottom of your crust. If using glass, reduce the oven temperature by twenty five degrees and add five extra minutes to the bake time.
The surface of the pie should look matte and slightly cracked, similar to a traditional pumpkin pie. If it looks wet and shiny in the very center, it needs five more minutes in the oven. The color should be a burnished orange, indicating that the sugars in the evaporated milk have caramelized slightly. You will hear a very faint crackling sound as the pie cools on the counter, which is the custard gently contracting and releasing steam. This is the sweet sound of a perfectly baked dessert. Once it has rested, it slices beautifully, revealing that distinct bottom layer of tender crust and the thick, creamy custard resting on top.
Variations and Dietary Adjustments
One of the best things about mastering the basic impossible pumpkin pie is how easily you can adapt it to suit different tastes and dietary needs. Because the recipe relies on a simple ratio of liquid to baking mix, you can swap ingredients without ruining the structural integrity of the pie. If you want to make this dessert slightly lighter, you can substitute the evaporated milk with an equal amount of half and half, though the custard will be a bit less rich. For a dairy free version, full fat coconut milk works beautifully. It adds a subtle tropical note that pairs surprisingly well with the cinnamon and ginger.
If you need to make this recipe gluten free, you cannot use a standard baking mix. You will need to make your own quick mix using a one to one gluten free flour blend, a half teaspoon of baking powder, and a tablespoon of melted coconut oil or vegan butter. The texture of the bottom layer will be slightly more delicate than the original version, but it will still form that characteristic crust. You can explore other gluten free desserts like a gluten free chocolate cake for more baking inspiration.
For those who want to experiment with flavor, try adding a half cup of chopped pecans or walnuts right on top of the batter just before it goes into the oven. As the pie bakes, the nuts will toast and sink slightly into the custard, adding a wonderful crunch that contrasts with the smooth pumpkin. You can also swap the white sugar for dark brown sugar. Dark brown sugar contains molasses, which deepens the caramel notes of the pie and makes the color even richer. If you love the combination of fruit and squash, try folding a half cup of fresh or frozen cranberries into the batter. The tart berries burst during baking, creating little pockets of bright acidity that cut through the heavy dairy.
Another fantastic variation is adding a layer of cream cheese. Drop small dollops of softened cream cheese onto the batter right before baking. As the pie cooks, the cream cheese melts into the custard, creating a marbled effect and a tangy flavor reminiscent of a cheesecake. You can also top the finished pie with a generous dollop of fresh whipped cream and a dusting of extra nutmeg. The cool, airy cream balances the dense, warm spices of the filling. Whether you stick to the classic recipe or try one of these variations, the fundamental magic of the impossible pie remains the same. It is a dessert that looks complicated but requires almost no technical skill to pull off successfully.
Serving, Storing, and Making Ahead
When it comes to serving your impossible pumpkin pie, the options are wonderfully simple. This dessert is equally delicious served warm, right after its initial resting period, or chilled straight from the refrigerator. If you serve it warm, the bottom crust will be soft and tender, almost like a steamed pudding. If you serve it cold, the custard firms up considerably, making it much easier to slice into perfect, clean wedges. I personally prefer it chilled with a spoonful of lightly sweetened whipped cream on top. The temperature contrast between the cold cream and the chilled pie is delightful.
Making this pie ahead of time is a great strategy for holiday entertaining. You can bake the pie up to two days in advance. Once it has completely cooled to room temperature, cover it tightly with plastic wrap and store it in the refrigerator. The flavors actually deepen and meld together overnight, making the pumpkin and spices taste even more pronounced the next day. When you are ready to serve, you can slice it cold, or you can warm individual slices in the microwave for fifteen seconds to take the chill off.
If you have leftovers, they will keep beautifully in the fridge for up to four days. Because this is a custard based pie, you should not leave it sitting out on the counter at room temperature for more than two hours. The dairy and eggs will spoil if left out for too long. If you want to store it for an even longer period, you can freeze the baked pie. Wrap the whole pie plate tightly in a layer of plastic wrap followed by a layer of aluminum foil. It will keep in the freezer for up to two months. To thaw, simply transfer it to the refrigerator and let it sit overnight.
To reheat a slice, place it in a three hundred degree oven for about ten minutes. This gentle heat will warm the custard through without causing the edges to weep or the crust to dry out. This pie is a fantastic make ahead option for a Thanksgiving dessert table. It frees up valuable oven space on the big day because it can be baked entirely in advance. Your guests will be amazed when they see the distinct crust layer at the bottom, and you can enjoy the secret that it took you less than ten minutes to prepare. The simplicity of the recipe allows you to focus on other dishes, perhaps a savory pumpkin soup for the main course, knowing your dessert is already handled.
Frequently Asked Questions
What are some tips for making impossible pumpkin pie?
For the best results, make sure all your ingredients are at room temperature before blending. This helps the eggs and dairy combine smoothly without overmixing. Also, grease your pie plate generously with butter so the self forming crust releases easily. Always let the pie rest for at least an hour after baking so the layers can fully set before slicing.
Does impossible pumpkin pie need to be refrigerated?
Yes, it must be refrigerated. Because the recipe contains a large amount of evaporated milk and eggs, it is a custard based dessert. Once the pie has cooled completely to room temperature, cover it tightly and store it in the refrigerator for up to four days to maintain food safety and texture.
How to make impossible pumpkin pie?
You simply blend pumpkin puree, evaporated milk, eggs, melted butter, sugar, spices, and a baking mix like Bisquick until smooth. Pour this thin batter into a greased pie plate and bake. The baking mix sinks to the bottom to form a tender crust while the pumpkin mixture rises to create a silky custard layer on top.
Can I use a different sized pie plate?
A standard nine inch pie plate is ideal for this recipe. If you use an eight inch plate, the batter will be too deep and the center might not fully set, leaving you with a gummy texture. If you use a ten inch plate, the pie will be too shallow and will bake much faster, so check it at forty minutes.
Conclusion
The impossible pumpkin pie is a brilliant solution for anyone who craves homemade dessert without the fuss of making pastry. By understanding how the baking mix sinks and the custard rises, you can confidently bake a pie that looks complex but requires only a blender and a single bowl.
Make this impossible pumpkin pie, then tell me how yours turned out. I love hearing about the variations you come up with in your own kitchens.
For more recipes like impossible pumpkin pie, follow us on Facebook and Pinterest for cozy autumn dessert ideas.
More recipes in this series: