My first encounter with an impossible cheeseburger pie happened in my grandmother’s harvest gold kitchen, where a simple pour of batter magically formed its own buttery crust. It felt like pure kitchen magic. A self-crusting pie defies traditional baking logic, turning humble pantry staples into a structured, sliceable dinner without rolling a single pin.
Most recipes suffer from a soggy bottom or a rubbery, dense middle because the ratio of wet to dry ingredients is slightly off. I spent weeks testing this formula to guarantee a perfectly set center with a crisp, golden base every single time.
Coming up: the science behind the self-forming crust, the secret to layering your beef for maximum flavor, and the exact resting time needed for a clean slice.
Table of Contents
The magic of the self-crusting batter
What makes a Bisquick cheeseburger pie work is its seemingly magical batter. When you pour a simple mixture of milk, eggs, and baking mix over your savory fillings, it sinks and organizes itself as it bakes. The heavier solids in the baking mix sink to the bottom of the pie plate, while the lighter liquids and fats rise to the surface. This natural separation creates that tender, biscuit-like bottom layer that firmly holds everything together. The proteins in the eggs coagulate in the oven’s heat, binding the milk and flour into a sturdy yet delicate crust. You get all the comfort of a traditional savory pastry without the tedious work of cutting butter into flour or chilling dough for hours.
Understanding the science of this batter changes how you approach the entire baking process. The fat content in your milk plays a specific role in the final texture. Whole milk provides a richer flavor and a more tender crumb, while lower fat milks can yield a slightly rubbery texture. The baking mix already contains shortening or oil, which coats the flour proteins and prevents them from developing too much gluten. This is why an impossible pie remains soft and pillowy rather than turning tough when you cut into it. You are essentially creating a savory clafoutis or a loose pancake batter that knows exactly how to organize itself in the oven. If you enjoy this clever approach to baking, you might also like our impossible broccoli pie which uses the exact same scientific principle to turn vegetables into a hearty meal.
To get this reaction right, you must use the correct proportions. Too much liquid and the batter never fully sets, leaving you with a gummy center. Too much baking mix and you end up with a dry, dense brick. The ratio we use here has been tested multiple times to hit the sweet spot. You want a batter that pours easily off a spoon but still has enough body to suspend a few air bubbles. When whisking everything together, take care not to overmix. A few small lumps in the batter are perfectly fine and will actually bake out during baking. Overmixing activates the gluten, which can make the crust chewy. Whisk just until the dry and wet ingredients come together in a smooth, pourable liquid, then stop. That is what gives you the right texture every time.
Print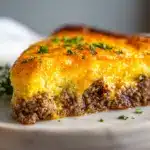
Impossible Cheeseburger Pie: The Self-Crusting Weeknight Wonder
- Total Time: 55 min
- Yield: 6 servings 1x
Description
This savory impossible cheeseburger pie combines seasoned ground beef, melted cheddar cheese, and a simple baking mix batter that forms its own crust while baking. A quick and comforting weeknight dinner option that requires no rolling pins or pastry dough.
Ingredients
For the beef filling:
1 lb ground beef (80/20 lean)
1 cup yellow onion (diced)
1 tsp Worcestershire sauce
1/2 tsp salt
1/4 tsp black pepper
For the pie:
1 cup sharp cheddar cheese (shredded)
1 cup milk (whole)
2 large eggs
1/2 cup baking mix (like Bisquick)
Instructions
1. Preheat your oven to 400 degrees Fahrenheit and grease a 9 inch glass pie plate with butter or nonstick spray.
2. Place a large skillet over medium high heat and add the ground beef, breaking it apart with a spoon. Cook for about 5 minutes until browned.
3. Add the diced onion to the skillet and cook for another 3 minutes until the onions are soft and translucent. Drain any excess grease.
4. Stir the Worcestershire sauce, salt, and black pepper into the beef mixture. Spread the seasoned beef and onions evenly across the bottom of the prepared pie plate.
5. Sprinkle the shredded sharp cheddar cheese evenly over the warm beef layer.
6. In a medium bowl, whisk together the milk, eggs, and baking mix until smooth and pourable. Do not overmix.
7. Pour the batter slowly over the beef and cheese in the pie plate.
8. Bake for 25 minutes until the top is golden brown and a knife inserted in the center comes out clean.
9. Let the pie rest for 10 minutes before slicing so the center sets completely.
Notes
Store in the refrigerator for up to 4 days or freezer for up to 3 months. Reheat at 325 degrees Fahrenheit for 10 minutes.
You can substitute self rising flour plus 1 tablespoon of melted butter for the baking mix.
For extra flavor, try adding a tablespoon of chopped pickled jalapenos to the beef layer before baking.
- Prep Time: 15 min
- Rest Time: 10 min
- Cook Time: 30 min
- Category: Main Course
- Method: Baking, Stovetop
- Cuisine: American
Nutrition
- Serving Size: 1 slice
- Calories: 385 kcal
- Sugar: 4 g
- Sodium: 520 mg
- Fat: 24 g
- Saturated Fat: 11 g
- Unsaturated Fat: 10 g
- Trans Fat: 0 g
- Carbohydrates: 12 g
- Fiber: 1 g
- Protein: 28 g
- Cholesterol: 125 mg
Building the perfect beef foundation
A great impossible cheeseburger pie starts with deeply savory, well-seasoned ground beef. The batter cannot do all the heavy lifting. You need to build flavor in the meat before it ever sees the baking dish. Start by selecting ground beef with an 80/20 lean to fat ratio. This provides enough fat to keep the meat moist and flavorful without making the final pie greasy. If you use a leaner cut like 93/7, the beef can become dry and crumbly during the bake. Place a large skillet over medium high heat and add just a tiny drizzle of oil to prevent sticking. Once the oil shimmers, add your ground beef and let it sit undisturbed for a full minute. This allows a deep brown crust to form on the meat, which translates to a massive boost in flavor through the Maillard reaction.
Once the beef is browned, you need to manage the grease carefully. Leaving too much liquid fat in the skillet will float into your batter and create an oily slick on top of the pie. Use a slotted spoon to transfer the cooked beef to a paper towel lined plate. Leave about one tablespoon of the beef drippings in the pan and discard the rest or save it for another use. Toss your diced onions into those hot drippings. The onions soak up the savory flavor and soften. Cook them until they are translucent and just beginning to caramelize at the edges, releasing a sweet aroma into your kitchen. Add a pinch of salt here to draw out the moisture from the onions and help them break down faster. You can also add a splash of Worcestershire sauce at this stage. The heat will cause the alcohol to evaporate instantly, leaving behind a rich, umami backbone that makes the beef taste deeply savory.
- Skipping the onion caramelization. Cook the diced onions in the beef drippings until soft and sweet to build a deep flavor base instead of tossing them in raw.
- Pouring the batter over hot filling. Let the beef and onion mixture cool for five minutes so you do not prematurely scramble the eggs in your batter.
- Using pre shredded cheese. Grate a block of sharp cheddar by hand so it melts smoothly and evenly without the anti caking additives found in bagged cheese.
- Under seasoning the beef. Add the Worcestershire sauce and salt directly to the skillet while the meat is still hot so the flavors penetrate the crumbles.
- Overmixing the batter. Whisk just until the ingredients are combined to prevent activating the gluten and creating a tough crust.
The importance of resting and slicing
Pulling a beautiful, golden brown impossible cheeseburger pie out of the oven is exciting, but patience is your best tool right now. The most common mistake people make is slicing into the pie immediately after it comes out of the oven. When the pie is piping hot, the internal structure has not fully set. The custard and baking mix matrix is still liquid and bubbling. If you cut into it at this stage, the filling will flood out, leaving a soupy crater in the center of your dish. You must let the pie rest at room temperature for exactly ten minutes. During this time, the residual heat continues to gently cook the center while the proteins firm up. The pie will still be plenty warm when you serve it, but it will hold its shape on the plate.
Resting also allows the fats to settle back into the food. As the pie cools slightly, the steam condenses and the moisture redistributes evenly throughout the layers. This prevents a watery layer from forming between the beef and the crust. You will notice that the pie pulls away slightly from the edges of the glass pie plate as it rests, which tells you the structure has locked into place. When you are ready to slice, use a sharp knife and a gentle sawing motion. Do not press down hard, or you will compress the tender crust and squish the fluffy top layer. Cut clean wedges and use a pie server to lift them out, making sure to scoop under the bottom crust entirely. This resting period is also a good time to throw together a side dish. A crisp green salad or some roasted vegetables cuts through the richness of the beef and cheese. Check out our cottage cheese sweet potato bowl for another way to pair proteins with comforting sides.
Variations and mix ins
Once you have mastered the classic impossible cheeseburger pie, the recipe becomes a blank canvas for your favorite flavors. The basic formula is so forgiving that you can add a variety of ingredients without breaking the batter. If you want to add a little heat, try mixing a teaspoon of smoked paprika and a pinch of cayenne pepper into your ground beef while it browns. You can also stir in a few tablespoons of pickled jalapenos right before you pour the batter. The brine from the peppers adds a sharp acidic punch that cuts through the richness of the cheddar. For a bacon cheeseburger twist, fry up four strips of thick cut bacon until crispy. Crumble the bacon and sprinkle it over the beef layer in the pie plate. The smoky flavor will infuse the entire dish as it bakes.
You can also experiment with different cheese blends to change things up. Sharp cheddar is the classic choice because it melts well and has a bold flavor that stands up to the beef. Try swapping half of the cheddar for a smoked gouda or a pepper jack for a completely different experience. If you want to add some vegetables to the mix, finely diced bell peppers or mushrooms work well. Sauté them with the onions so they release their moisture in the skillet rather than weeping into your batter. If you want to explore more savory batter pies, our impossible ham and cheese pie uses a very similar technique with totally different flavor results. For a fun twist on a diner classic, you can even swap the ground beef for ground sausage and add a pinch of sage for a breakfast inspired version. The self-crusting batter handles these substitutions well as long as you keep the total volume of mix ins roughly the same.
What to serve with Impossible Cheeseburger Pie
Because this dish is rich and filling, it benefits from bright, crisp sides that provide textural contrast. While it is entirely satisfying on its own, pairing it with the right sides turns it into a complete dinner. A simple arugula salad dressed with lemon juice and olive oil is my go-to. The peppery bite of the arugula and the sharp acidity of the lemon cut through the richness of the cheese and beef. You could also serve this with a side of sweet potato fries maple mustard sauce. The natural sweetness of the potatoes and the tangy mustard in the dipping sauce complement the savory pie crust, creating a meal that feels like an upgraded diner special.
If you want to lean into the classic burger theme, consider serving your pie with a side of dill pickle spears and some fresh tomato slices. The cold, crunchy pickles provide a briny contrast to the warm, soft pie. You can also offer small bowls of traditional burger condiments on the table. A smear of ketchup or a dab of yellow mustard on your slice of pie is surprisingly delicious and reinforces the cheeseburger theme. For a heartier spread, roasted broccoli or steamed green beans tossed with garlic butter are good vegetable sides. Avoid heavy sides like mashed potatoes, which would make the meal feel overly dense. Instead, focus on vegetables and salads that add color and crunch to your plate.
Storing and reheating leftovers
One of the best things about this self-crusting cheeseburger pie is how well it stores. You can easily make it ahead of time or save the leftovers for a quick lunch the next day. Once the pie has cooled completely to room temperature, cover the pie plate tightly with plastic wrap or transfer individual slices to airtight containers. Store it in the refrigerator for up to four days. The flavors actually deepen overnight as the beef and onions meld with the custard, making the leftovers highly anticipated in my house. When you are ready to eat, you want to reheat it gently so the crust does not dry out or become tough.
The best method for reheating is to use the oven. Preheat your oven to 325 degrees Fahrenheit and place the slice on a baking sheet. Cover it loosely with aluminum foil to prevent the top from browning too much, and heat it for about ten to twelve minutes until it is warmed through. If you are in a rush, you can use the microwave, but be aware that the crust will lose some of its crispness and become slightly soft. Microwave on medium power in thirty second intervals to avoid overheating the cheese and causing it to separate. If you want to freeze the pie, it is best to freeze it before baking. Assemble the pie completely, wrap it tightly in a layer of plastic wrap followed by a layer of aluminum foil, and freeze for up to three months. When you are ready to bake, do not thaw it. Simply place the frozen pie in a cold oven, turn the heat to 350 degrees Fahrenheit, and bake for fifty to fifty five minutes until the center is set and the top is golden. If you love meals that transition easily from freezer to oven, our chicken pot pie soup is another good option for meal prep.
Frequently asked questions
What is Impossibly Easy Cheeseburger Pie?
Impossibly Easy Cheeseburger Pie is a classic savory Bisquick dish where a liquid batter of milk, eggs, and baking mix is poured over browned ground beef, onions, and cheese. As it bakes, the batter forms its own bottom crust and a tender top layer, creating a complete pie without needing to roll out any pastry dough.
How do you make Impossible cheeseburger pie?
You make it by browning ground beef with onions and Worcestershire sauce, then spreading that mixture into a greased pie plate. You sprinkle shredded cheese over the meat, pour a simple batter of milk, eggs, and baking mix on top, and bake at 400 degrees Fahrenheit for about 25 minutes until golden and set.
What goes with Impossible cheeseburger pie?
This rich dish pairs well with light, crisp sides that offer textural contrast. A simple arugula salad with lemon vinaigrette, dill pickle spears, roasted broccoli, or sweet potato fries are all good choices. You can also serve it with traditional burger condiments like ketchup and mustard.
What is the origin of Impossible Cheeseburger Pie?
The recipe originated in the 1970s as a promotional campaign by the makers of Bisquick baking mix. It was designed to show off how versatile the product was by creating a “magic” self-crusting pie that simplified traditional baking. It quickly became a family favorite and a staple in American home cooking.
Can I use self rising flour instead of Bisquick?
Yes, you can substitute self rising flour, but you need to add a fat source to replicate the Bisquick formula. For every cup of self rising flour, add one tablespoon of melted butter or vegetable oil to your wet ingredients. This will ensure your crust bakes up tender and golden just like the original.
Can I make cheeseburger pie ahead of time?
You can assemble the entire pie up to 24 hours in advance and keep it covered in the refrigerator. When you are ready to bake, you may need to add an extra five minutes to the baking time to account for the cold dish going into a hot oven. Alternatively, you can freeze the unbaked pie for up to three months.
Conclusion
The impossible cheeseburger pie is a triumph of home cooking, turning simple ingredients into a structured, comforting meal through a clever bit of baking science. By understanding how the batter separates, seasoning your beef properly, and letting the pie rest before slicing, you guarantee perfect results that taste like pure nostalgia.
Carve out an evening this week and give it a go. It is a low stress, high reward dinner that will have everyone asking for seconds and wondering exactly how you made a crust without a rolling pin.
For more recipes like impossible cheeseburger pie, follow us on Facebook and Pinterest for cozy casserole inspiration.
More recipes in this series: