The secret to perfect fried red velvet donuts isn’t just the color; it’s knowing exactly when to add the cocoa powder. Get it wrong, and you lose that deep, tangy flavor you’re after. I used to end up with cakey, bland doughnuts until I figured out the timing.
This recipe solves that with a straightforward, no-fuss dough and a homemade cream cheese glaze that sets perfectly in minutes. You’ll learn which oil temperature keeps them from getting greasy, how to get a vibrant red without chemical aftertaste, and the trick to fixing a custard filling that’s too thick to pipe.
You’re 2.25 hours from a warm, bakery-style treat.
Table of Contents
Why You’ll Love These Fried Red Velvet Donuts
This recipe is your shortcut to a bakery-quality treat without the mystery. I’ve made dozens of batches to land on a dough that fries up soft and airy every time, with that signature tangy red velvet flavor. You’ll love them because they combine a nostalgic, cake-like crumb with a satisfyingly crisp exterior. The rich cream cheese glaze seals the deal, clinging perfectly without being overly sweet.
Print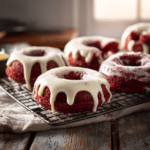
Fried Red Velvet Donuts
- Total Time: 1.75–2.25 hours
- Yield: 15 donuts 1x
Description
These fried red velvet donuts have a soft, cake-like interior with a crisp exterior, finished with a tangy cream cheese glaze. Made with a simple no-knead yeast dough that rises once before frying, they deliver bakery-style texture at home. Perfect for holidays, weekend baking, or when you want a bold red velvet treat with classic flavor and irresistible contrast. Ready in about two hours from start to finish.
Ingredients
For the Dough:
3 ½ cups (455g) all-purpose flour, plus more for dusting
⅓ cup (65g) granulated sugar
2 ¼ tsp (1 packet) instant yeast
1 tsp baking powder
1 tsp salt
2 tbsp (15g) cocoa powder
1 cup (240ml) buttermilk, warmed to about 105°F
2 large eggs, at room temperature
3 tbsp (45g) unsalted butter, melted and cooled
1 tsp vanilla extract
1 tbsp red gel food coloring
For Frying:
8 cups (about 2 liters) vegetable or canola oil
For the Cream Cheese Glaze:
4 oz (115g) cream cheese, softened
1 ½ cups (180g) powdered sugar
1 tsp vanilla extract
2–3 tbsp milk
Optional Custard Filling:
1 cup prepared vanilla custard or pudding
Instructions
1. Make the Dough: In a large mixer bowl, whisk together flour, sugar, yeast, baking powder, salt, and cocoa powder. In a separate jug, combine warm buttermilk, eggs, melted butter, vanilla, and red food coloring. With the mixer running on low using a dough hook, slowly pour the wet ingredients into the dry ingredients. Mix for 2–3 minutes until a very sticky dough forms. Cover the bowl and let rise in a warm place until doubled in size, about 60–90 minutes.
2. Cut the Donuts: Turn the risen dough onto a heavily floured surface. Gently pat to about ½-inch thickness. Use a floured 3-inch cutter to cut rounds. Use a 1-inch cutter for donut holes. Re-roll scraps once if needed.
3. Fry the Donuts: Heat oil in a heavy Dutch oven over medium heat until it reaches 350°F. Carefully slide 2–3 donuts into the oil using a slotted spoon, avoiding overcrowding. Fry for 60–90 seconds per side until deep reddish-brown and lightly hollow-sounding when tapped. Transfer to a wire rack to drain.
4. Make the Glaze: Beat softened cream cheese until completely smooth. Gradually beat in powdered sugar and vanilla. Add milk one tablespoon at a time until thick but pourable.
5. Glaze the Donuts: Dip one side of each slightly warm donut into the glaze. Place back on the rack to allow excess glaze to drip off. Let set before serving.
6. Optional Filling: If using custard filling, allow donuts to cool completely. Fit a piping bag with a Bismarck tip, fill with custard, insert into the side of each donut, and gently pipe until slightly filled.
Notes
The dough will be very soft and sticky, this is normal and helps create lighter donuts.
Maintain oil temperature at 350°F using a thermometer. Allow oil to return to temperature between batches to prevent greasy donuts.
Add red food coloring to the wet mixture before combining with cocoa powder for the most vibrant color.
Store in an airtight container in the refrigerator for up to 3 days. Freeze unglazed donuts for up to 3 months. Reheat at 350°F for about 5 minutes before serving.
- Prep Time: 30 min
- Rise Time: 1–1.5 hours
- Cook Time: 15 min
- Category: Dessert, Snack
- Method: Frying
- Cuisine: American
Nutrition
- Serving Size: 1 donut
- Calories: 285 kcal
- Sugar: 18 g
- Sodium: 180 mg
- Fat: 14 g
- Saturated Fat: 3.5 g
- Unsaturated Fat: 10.5 g
- Trans Fat: 0 g
- Carbohydrates: 35 g
- Fiber: 1 g
- Protein: 5 g
- Cholesterol: 35 mg
The Perfect Valentine’s Treat
Forget the heart-shaped box of chocolates. A platter of warm fried red velvet donuts with their deep crimson color and snowy white glaze is a gesture that actually tastes good. The combination of buttermilk and cocoa powder gives them a subtle tang that cuts through the sweetness, making them far more interesting than a basic cake donut. They look impressive, but the process is straightforward, no fancy piping skills needed unless you’re adding a simple custard filling.
I started making these for friends years ago, and they’ve become my most-requested February bake. The visual is everything. For the best color, add your red food coloring to the wet ingredients before mixing in the dry cocoa powder. This prevents the cocoa from clumping and ensures a uniform, vibrant hue throughout the dough. If you’re looking for a baked option, my red velvet donuts with vanilla glaze and oreo crumble are fantastic, but frying creates an unmatched tender texture.
- Visually stunning with minimal effort
- Flavor is complex, not just sweet
- The cream cheese glaze is a classic, perfect pairing
- Customizable with a filling or sprinkles
Soft, Fluffy, and Crispy
The magic of a great fried donut lies in the contrast of textures, and this recipe delivers exactly that. Using buttermilk and a touch of baking powder alongside the yeast guarantees a light, cakey interior that stays moist. The real secret, though, is frying at the right temperature. You must use a thermometer. 350°F is the sweet spot; any lower and they soak up oil, any higher and the outside burns before the inside cooks.
I use a Dutch oven for frying because it maintains a steady temperature so well. The dough puffs up almost immediately when it hits the hot oil, creating that iconic fluffy ring. They fry in just 60-90 seconds per side. You’ll know they’re done when they’re a deep reddish-brown and sound hollow when tapped. Let them drain on a rack, not paper towels, to keep the underside from getting soggy. Then, dip them in the glaze while they’re still slightly warm. For more on that iconic red velvet flavor profile, my red velvet cupcakes cream cheese frosting recipe breaks down the science of the buttermilk-cocoa reaction.
Ingredients and Equipment for Perfect Donuts
Active Time: 30 minutes
Total Time: 1.75–2.25 hours (includes 60–90 minute rise time)
Yield: 15 donuts
- For the Dough:
- 3 ½ cups (455g) all-purpose flour, plus more for dusting
- ⅓ cup (65g) granulated sugar
- 2 ¼ tsp (1 packet) instant yeast
- 1 tsp baking powder
- 1 tsp salt
- 2 tbsp (15g) cocoa powder
- 1 cup (240ml) buttermilk, warmed to about 105°F
- 2 large eggs, at room temperature
- 3 tbsp (45g) unsalted butter, melted and cooled
- 1 tsp vanilla extract
- 1 tbsp red food coloring (gel works best)
- For Frying:
- 8 cups (about 2 liters) vegetable or canola oil
- For the Cream Cheese Glaze:
- 4 oz (115g) cream cheese, softened
- 1 ½ cups (180g) powdered sugar
- 1 tsp vanilla extract
- 2-3 tbsp milk
- Optional Custard Filling:
- 1 cup prepared vanilla custard or pudding
No buttermilk? Mix 1 cup of milk with 1 tbsp of lemon juice or vinegar. Let it sit for 5 minutes. No instant yeast? Use active dry yeast and proof it in the warm buttermilk with a pinch of sugar first.
Key Ingredients Explained
The cocoa powder is non-negotiable. Use natural, not Dutch-process, for that classic, slightly acidic red velvet flavor that pairs with the buttermilk. Add it to your dry ingredients. The buttermilk does two jobs: it tenderizes the dough and provides tang. Make sure it’s warm (about 105°F) to wake up the yeast without killing it. For the color, gel food coloring gives a vibrant hue without thinning the batter. Liquid coloring works, but you may need 2-3 tablespoons.
Room temperature eggs and melted (but cooled) butter incorporate more evenly, creating a smoother dough. The granulated sugar feeds the yeast and sweetens the crumb, while the powdered sugar in the cream cheese glaze dissolves instantly for a silky finish. If your glaze is too thick, add milk a teaspoon at a time. For a thinner, more drizzle-friendly glaze, add more liquid, but here we want it to cling.
Essential Equipment
You’ll need a heavy-bottomed pot for stable frying. A Dutch oven is ideal because it holds heat so consistently. A thermometer is your most important tool. Maintaining your oil at 350°F is what separates a light, fluffy donut from a greasy one. Don’t guess.
For the dough, a standard rolling pin and a 3-inch round cutter (a wide glass works) are perfect. A 1-inch cutter for the holes is optional. You’ll also need a slotted spoon or spider for flipping and removing the donuts. A wire cooling rack set over a baking sheet is better than paper towels for draining; it keeps the underside crisp. A stand mixer with a dough hook makes kneading easy, but your hands work just fine too, it’s a forgiving dough. For filling them, a piping bag with a Bismarck tip is needed if you’re adding the optional custard filling.
Step-by-Step Instructions for Frying Red Velvet Donuts
Making the No-Knead Dough
- In your mixer’s bowl, whisk together the flour, granulated sugar, yeast, baking powder, salt, and cocoa powder.
- In a separate jug or bowl, combine the warm buttermilk (about 105°F), eggs, melted butter, vanilla extract, and red food coloring.
- With the mixer running on low with a dough hook attachment, slowly pour the wet ingredients into the dry ingredients.
- Mix for 2-3 minutes until a very sticky dough forms and pulls away from the sides of the bowl.
- Scrape down the bowl, cover it with plastic wrap or a damp towel, and let it rise in a warm spot until doubled in size; this takes about 60-90 minutes. You won’t knead it.
Cook’s Tip: This dough will be very soft and sticky, that’s correct! A wetter dough makes lighter donuts. Use plenty of flour when you roll it out later.
Frying at the Perfect Temperature
- Heat your oil in a heavy Dutch oven over medium heat until it reaches 350°F / 175°C. Use your thermometer.
- While it heats, turn your risen dough onto a heavily floured surface. Gently pat it to about ½-inch thickness.
- Use a floured 3-inch cutter to stamp out rounds. Use a 1-inch cutter for holes. Re-roll scraps once.
- Carefully slide 2-3 donuts into the hot oil using a slotted spoon or spider tool; don’t crowd them.
- Fry for 60-90 seconds per side until they’re a deep reddish-brown and sound hollow when tapped lightly.
- Transfer finished donuts to a wire rack set over a tray to drain completely.
Watch Out: The temperature will drop when you add cold dough. Let it recover to 350°F before adding the next batch to prevent greasy results.
Glazing and Filling
- For the glaze: beat softened cream cheese until smooth. Gradually beat in powdered sugar and vanilla extract.
- Add milk one tablespoon at a time until you get a thick but pourable consistency.
- Dip just one side of each slightly warm donut into the glaze immediately after draining, the warmth helps it set beautifully.
- Return them to the rack to let any excess drip off.
- If using custard filling, let your donuts cool completely first.
- Fit a piping bag with a Bismarck tip (a long tip). Fill it with prepared vanilla custard or pudding.
- Insert the tip into one side of each donut’s “waist” (not through the top) and gently squeeze until you feel slight resistance; this means they’re full.
Pro Tip: If your glaze gets too thin from warming up while dipping, just pop it in the fridge for five minutes to thicken it back up.
Serving, Storage, and Expert Tips
How to Serve Your Donuts
These donuts are best served the day they’re made, ideally within an hour of glazing. The contrast between the crisp exterior and soft, cakey interior is at its peak when they’re still slightly warm. For a classic presentation, just serve them glazed. If you want to get fancy, a few ideas:
- Fill them with the vanilla custard for a surprise inside.
- Add festive sprinkles on top of the wet glaze for a party look.
- Dust plain (unglazed) ones with powdered sugar for a simpler treat. I love pairing them with strong black coffee, the bitterness balances the sweet cream cheese glaze perfectly.
Storing and Reheating
Because of the dairy in the dough and glaze, these donuts must be stored in the fridge or freezer. Never leave them on the counter overnight.
| Fridge | Up to 3 days | Store in a single layer in an airtight container. Place parchment paper between layers if stacking. |
| Freezer | Up to 3 months | Freeze unglazed donuts on a tray until solid, then transfer to a freezer bag. Thaw overnight in the fridge before glazing. |
| Reheat | — | To revive that fresh texture, warm refrigerated donuts in a 350°F oven for 5 minutes. Let them cool slightly before eating. |
Troubleshooting Common Issues
Even with careful steps, small things can happen. Here’s how to fix them.
Problem: Dough is impossibly sticky
Solution: This dough is meant to be soft, but if it’s unworkable, add more flour one tablespoon at a time while mixing. Too much flour makes tough donuts, so go slow.
Problem: Donuts are greasy and heavy
Solution: Your oil temperature was likely too low. The dough absorbs oil below 350°F. Let the oil fully reheat between batches and keep your thermometer in the pot.
Problem: The cream cheese glaze is too thick or too thin
Solution: If it’s thick like paste, add milk one teaspoon at a time. If it’s runny and slides off, stir in more powdered sugar or chill it for 5-10 minutes to firm up.
Your Fried Red Velvet Donuts Questions, Answered
What oil do I use for frying?
Use a neutral oil with a high smoke point, like vegetable or canola oil. You’ll need about 8 cups to fill your Dutch oven 2-3 inches deep. The most critical thing is keeping it at a steady 350°F using a thermometer; the oil type matters less than the temperature control for non-greasy results.
Can I use natural food coloring?
You can, but the color will be more muted, like a brick red or pink. Gel food coloring gives the vibrant hue you expect. If using a natural powder like beet, mix 1-2 tablespoons with the warm buttermilk first to help it dissolve and prevent grainy specks in your dough.
How do I fix too-thick custard?
If your custard filling is too thick to pipe, whisk in milk or heavy cream, one teaspoon at a time, until it’s smooth and pipeable. Do this after it’s fully cooled. Test the consistency by piping a bit onto a plate, it should flow easily but hold its shape.
Are donuts better, fried or baked?
For texture, fried is superior. Frying at 350°F creates a crisp exterior and a uniquely soft, airy interior that baking can’t replicate. Baked red velvet donuts are more like muffins. If you want the real, classic donut experience with that tender crumb, frying is the way to go.
The biggest wins here are the no-knead dough that’s ready in one bowl and frying at a steady 350°F for a guaranteed crispy, non-greasy finish. It feels like a project but comes together without any fuss. I always make the glaze while the first batch fries, so it’s ready for dipping while the donuts are still warm. Try this recipe this weekend; you’ll be shocked at how simple it is to get that perfect bakery texture at home.
For your next batch, do you prefer them classic with just the glaze, or filled with a little custard?
For more recipes like fried red velvet donuts, follow us on Facebook and Pinterest for easy dessert recipes and creative baking ideas.